My memories

  • Doorknob hangers design from My Memories

    Here is this weeks freebie from MyMemories, Doorknob hangers. This program has so many opportunities to design anything you could imagine. This weeks freebie comes with 2 different designs and a tutorial.


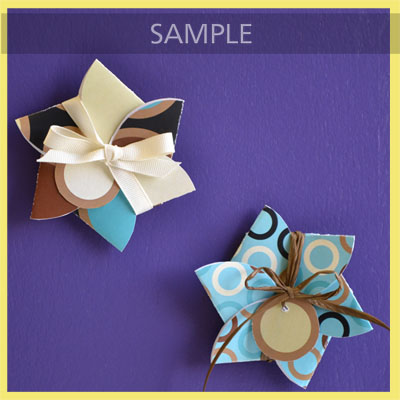
    doorknob hanger sample


    doorknob hanger sample

    Using MyMemories Software to Customize your Doorknob Hanger

    1. Download template file and install it into your software
    2. Using MyMemories Suite, choose Create Album From Designer Template and find your project
    3. Now you can add pictures, print and enjoy the provided template, or customize it with your own papers and embellishments.


    TIP:
    You can right-click on the white guide and lock it in place to keep it from moving while you are working. Make sure this is the top layer of your project before printing.
    Doorknob Hanger Tutorial
    1.  Print your doorknob templates on cardstock and gather supplies.  (Recommended supplies: bone folder, craft knife, cutting mat, metal edged ruler, small scissors, tape runner)
    gather supplies

    2.  Using the craft knife and metal edged ruler cut along outside line.
    TIP: a paper cutter could be used as an alternative
    trim edge

    3.  Repeat on all four sides.
    trim all edges

    4.  Using a bone folder, fold the doorknob hanger in half.

    5.  Apply a liberal amount of the glue of your choice and glue sides together.
    TIP: A tape runner works better than a glue stick!
    glue together

    6.  Using small scissors, cut out the white center circle.
    cut out circle

    7.  Hang on a door and Enjoy!!
    TIP: To make your doorknob hanger last longer, it is best to laminate your project.  Clear contact paper makes great Do-It-Yourself lamination.
    finished project


  • My Memories-Using outside Content

    When I first started preserving my memories digitally, I tried many programs. And even though I like them, none have been as user friendly as My Memories. And you don’t have to only use kits from My Memories to create wonderful layouts. And there are many tutorial videos to help whenever you have a question. Here is a helpful tutorial on accessing outside content in the my memories software by Lisa J.


  • Free Photo Box, My Memories

    Spring has sprung, and with all the beauty around- I somehow caught my first spring cold in years. Glad to be getting better and share with everyone the freebie from My Memories for this week. A photobox just in time for Mother’s Day!


    Download here 

    Photobox Tutorial
    Using MyMemories Software to Customize your Flower Card

    1. Download template file and install it into your software
    2. Using MyMemories Suite, choose Create Album From Designer Template and find your project
    3. Now you can add pictures, print and enjoy the provided template, or customize it with your own papers and embellishments.

    TIP:
    You can right-click on the white guide and lock it in place to keep it from moving while you are working. Make sure this is the top layer of your project before printing.

    Instead of adding the paper as a background paper, you can add it as an embellishment so that you can move the paper around.  This is especially useful when using papers with stripes or circles, so you can decide which part of the paper you want to use.

    Once it is added as an embellishment, you can now select the paper and move it into the position you want it.


    Don’t forget that Lifetime and My Memories is still offering the free photobook with code BK6FRE 


  • National Scrapbooking Day

    On Saturday May 5, it is National Scrapbooking day. As I go through all the lovely photographs my Grandma had saved through the years, it makes me want to do better at preserving memories of my kids. I have 4 kids, and my oldest just turned 16 years old. It went by to fast and I know it will be the same for my younger 3 kids. So many of my Grandma’s photos are a mystery as to who is in the photographs, no names or journal of the events.  I am truly lucky that my Aunt is helpful with some of these photographs. I love this photograph of my Great Aunt Lovella who taught me a lot about Genealogy. She is posing with her kids and mother in law on a donkey, most likely celebrating Cinco de Mayo-


    And this week My Memories is hosting a Very fun Challenge to Celebrate National Scrapbooking Day and Cinco de Mayo, starting Wednesday on their Blog. You’ll have to check out the MyMemories Facebook page on Friday, Saturday and Sunday this weekend for some fun games, super scraps and of course some SUPER FUN giveaways!!  And the AMAZING MyMemories Designers are sending out a BLOG TRAIN to give you all kinds of FUN FREEBIES!!!You will NOT want to miss a thing!  There’s going to be something fun for everyone!!

    My Memories is still offering a free photobook with their code BK6Fre.


  • Cute Card Freebie

    My Memories has become my favorite software out of all the ones I have used. So many things that you can do with My Memories Software, this week freebie is a flower card template. 


    Flower Card Tutorial

    Using MyMemories Software to Customize your Flower Card

    1. Download template file and install it into your software
    2. Using MyMemories Suite, choose Create Album From Designer Template and find your project
    3. Now you can print and enjoy the provided template, or customize it with your own papers and embellishments.

    TIP:
    You can right-click on the white guide and lock it in place to keep it from moving while you are working. Make sure this is the top layer of your project before printing.

    Instead of adding the paper as a background paper, you can add it as an embellishment so that you can move the paper around.  This is especially useful when using papers with stripes or circles, so you can decide which part of the paper you want to use.

    Once it is added as an embellishment, you can now select the paper and move it into the position you want it.


  • Free My Memories Photo book

    Mother’s day is around the corner and My Memories is offering a beautiful photobook for free- only pay for shipping and handling. You can view this morning Lifetime Balancing Act introduction of My Memories this morning here.

    Creating these photobooks are easy, and a lovely way to preserve your memories. Using code BK6FRE will give you the free photobook, and using code STMMMS36408 will give you $10 off your purchase of My Memories Software v3 and an additional $10.00 for your first kits.


  • Giftbag Freebie


    This weeks My Memories Freebie is a cute little Gift bag template. You can always edit and add elements that you want.


    STEPS:  Open MyMemories Suite software and choose your album size (I chose 8.5 x 11 Landscape for a printable project).

    Add the papers and elements you wish to use to create your own printable project (I made these Gift Bags for a birthday bag), and when you are finished, click:

    SHARE ALBUM ====> EXPORT PAGES and save as a .jpg!  The new .jpg papers you created are now usable as stand alone printable projects to use and reuse anytime!  The Freebies enclosed are just samples of the printable projects you can make! Here is the edited bag I made tonight.

    Just print, cut, score, fold and use!  You can add ribbon for a handle and any other elements you wish. A great way to give a gift!!  Super easy, and perfect for any occasion.


  • How To Upload a Photobook

    There are so many wonderful opportunities to highlight your families special memories. Here is the latest tutorial on MyMemories “How to Upload a Photobook.”  you can also get a $10 Discount on MyMemories v3 software using our promo code STMMMS36408. You can also get a special at RAStar with your software. 


    The Sister’s and I in 1978. Joy, Ula, Ida, Ora Lea, and Lovella. I’m the little girl holding my Great Grandma’s hand.

    This page design is one of CatDesignz